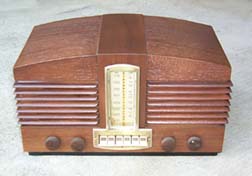
Stromberg Carlson 1110 Tabletop (1947)
Restoration Case History
|
|
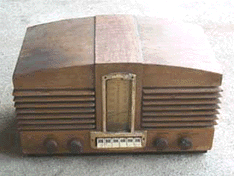
Stromberg Carlson 1110 as found
|
This Stromberg Carlson tabletop is a neat design. A walnut case with
groovy louvers, pushbuttons, and interesting dial. This radio was
purchased at a junk shop for $35, a bit more than I would typically
pay for a radio that was such a project, but I just loved the look of the
case, so I couldn't pass it up.
My initial inspection of the radio showed that it had two veneer chips
on the front (aren't they always on the front?). While I wasn't sure if
I could fix them, it didn't deter me. The finish was in very rough shape.
It looked like someone had already tried stripping it, or had spilled
something on the radio which had removed much of the finish. While this
is a walnut radio, the walnut has a very reddish tone to it - it almost
looks like cherry. This radio is pictured in Bunis, Volume 4, and you
can see the real reddish tinge to the walnut veneer.
Electronically, The radio barely worked when plugged
in. The dial cord was broken, but there is a stringing diagram inside of
the radio, so it shouldn't be too hard to figure out when the time comes.
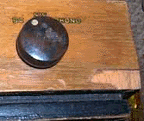
Cabinet Restoration
|
|
Damage on the front of the radio
|
The veneer chip on the front right corner was pretty apparent.
Here's a before photo
of what it looked like. These chips can be very difficult to fix. First,
you have to cut a piece of veneer to fit in the chipped area. Then, you
have to stain it to match.
I first tried inserting a piece of walnut veneer into the space. I was
able to cut a small chip, glue it in place, but it just didn't look right.
It was apparent to me that the chip would be visible no matter how
closely I could match the color. In the end, I decided the best thing
to do would be to remove the existing piece of veneer, and replace it
with a new piece. This would allow me to have an unmarred front of the
radio. While not 100% original, I felt that this was the best repair.
Thus began the hunt for a reddish tinged walnut veneer. I was never
able to find a walnut veneer other than in a dark brown, and that just
wouldn't work. The dark brown piece would be much darker than the rest of
the radio. In order to match them, I'd have to darken the rest of the
radio cabinet, which would make it look very unoriginal. I tried a piece of
cherry veneer. The color was right, but the grain pattern was so far off,
I knew I wouldn't be able to live with it.

|
|
The Weekend Refinisher
|
The radio sat for months as I hunted around for a red walnut veneer with
no luck. I even tried lumberyards and woodshops in different cities!
Then one day, while reading the book "Weekend Refinisher", I read
about bleaching wood, and I thought I would give that a try. The plan
was to put the walnut veneer on the front, then bleach it. That would
lighten the wood up. Then, I could put a reddish tinged stain on it to
try and match the rest of the case.
I carefully cut a piece of walnut stickon veneer into the right shape,
and stuck it on. I then trimmed it carefully to match exactly. Once
the outline was done, I used a 1/2" bit to drill the knob shaft
holes in the front. I put a piece of wood under the front of the cabinet
while drilling, to keep the veneer from splintering. The next step
was to apply the bleach. In this case, I used regular household Clorox.
I brushed it on, and put the case out in the sun. Apparently, the
combination of heat and sunlight helps the bleach work faster. I applied
two coats of bleach.
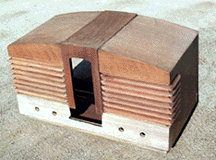
|
|
Veneer after bleaching
|
|
|
Veneer after a light coat of stain
|
One the left is what the cabinet looked like after
the bleach application.
As
you can see, the new veneer is very light. On the right is the
cabinet after applying a light coat of cherry stain to the new area of
veneer. As you can see, it matches pretty well! The next step was to
add a toning lacquer to the cabinet. I chose the Mohawk Van Dyke Brown
toner. Before lacquering, I sealed the cabinet with a light coat of
shellac. I then lightly buffed the case with 0000 steel wool, and ran
a tack cloth over the case to remove any dust or steel wool particles.
I then applied a very light coat of toning lacquer. The reason for the
toning lacquer is to try and give the piece a somewhat uniform color. The
various pieces of walnut and veneer in this radio all have different
colors, so the lacquer helps to smooth out the difference and give an
overall uniform appearance. Once the toning lacquer was applied, the
piece looked great and you really can't tell that the front has been
re-veneered.
|
|
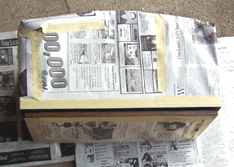
Spraying black lacquer
|
After the toning lacquer was done, I also needed to spray some black paint
or lacquer on the very bottom edge of the cabinet. This area was pretty
dinged up when the radio was purchased, but pictures show this area
should be a nice black color. I decided to use black gloss lacquer from
the local Ace Hardware. I used masking tape and newspaper to cover
every other part of the cabinet to prevent overspray. Once that was done,
I shot a couple of coats of the black on. The black lacquer dries to
the touch very quickly, so you can spray multiple coats in a very short
time. Several coats were needed to adequately cover the area. You don't
want to spray it on too thick or too fast, or it may run. It is better
to spray on several light coats, building it up until you cannot see
the underlying brown wood. After this was dry, I removed the masking
tape and paper and checked for any overspray - there was none. Once
I was sure the black lacquer was completely dry, I went over it thoroughly
with a piece of 0000 steel wool. This smoothed out the finish, as well
as toning to gloss down to a more subdued glow. This makes the piece
look more like the antique that it is, and not a brand new radio.
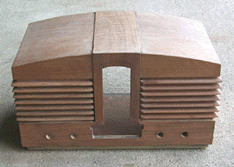
|
|
The almost finished case
|
On the left is a picture of the cabinet as it is now. The last step in the
cabinet restoration is to put the decals on the
front of the cabinet, then spray a few coats of clear lacquer over the
top to seal it. I have not been able to find the right sort of decals
to put over the knobs. I need to find the time to dig through the
decals at some of the local craft shops, perhaps I can make something
that will work. I also need to get working on the electronics! I've
got the schematic in hand, so that will be the next step (a good winter project).