 I was extremely excited when I won the bid on this radio on e-Bay, for
only $9.99! The seller stated that the radio worked, and that it was
in excellent condition. You can imagine how upset I was, when this
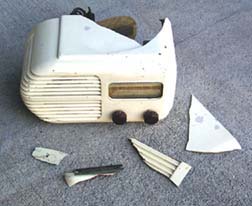
radio arrived in about 10 pieces! The seller had packaged the radio
by wrapping it in a piece of newspaper, with a couple hunks of styrofoam
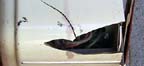
to "protect" it (yeah, right). Huge pieces of the radio were broken.
Chunks of bakelite were interspersed with glass from
broken tubes. Obviously, the radio had been dropped, or had something
very heavy dropped on it. It appeared to be a total loss. However, I did have all
the bakelite pieces....maybe it could be fixed??
I was extremely excited when I won the bid on this radio on e-Bay, for
only $9.99! The seller stated that the radio worked, and that it was
in excellent condition. You can imagine how upset I was, when this
radio arrived in about 10 pieces! The seller had packaged the radio
by wrapping it in a piece of newspaper, with a couple hunks of styrofoam
to "protect" it (yeah, right). Huge pieces of the radio were broken.
Chunks of bakelite were interspersed with glass from
broken tubes. Obviously, the radio had been dropped, or had something
very heavy dropped on it. It appeared to be a total loss. However, I did have all
the bakelite pieces....maybe it could be fixed??
|
|
|
Cabinet Restoration
|
|
|
|
|
|
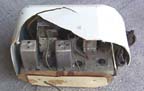
After removing the chassis, I began the restoration of this radio by piecing all the broken chips back onto the case, to make sure they would fit properly. Once I was sure they would, then began the long process of gluing the case back together. If you've read any of my other restoration chronicles, you'll know that I like to use Ace 60-second epoxy to glue bakelite chips. I slather the epoxy on quite liberally, then place the chip back into place and hold it until it is secure (or clamp, if possible). It took several days to glue in all the chips, as I waited for one area to dry before beginning on another area. I used half a tube of epoxy on just this one radio! Usually a tube will last me through 6-7 projects.
|
|
|
|
|
|
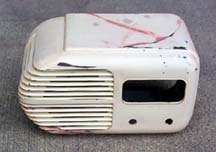
Once the radio had been glazed, I went ahead and shot an initial coat of primer on it. This would show me where all the problem areas would be, and I assumed there would be a lot of problem areas! After the primer had dried, I took a closer look. There were a lot of areas that needed more work. The photo on the right shows the case from the front after applying more glazing putty to the areas which still showed damage.
|
|
|
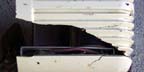
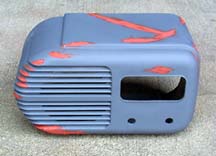
The photo on the left is another view of the case after the first priming, where I've glazed areas in need. The louvered area proved to be particularly hard to deal with, because of the intricate detail. You can see a lot of orange glazing putty in those areas! The cycle of priming and glazing can be repeated as many times as need be, until the case is ready. In most cases, it takes 3-4 cycles to get everything just right (that is if you are a perfectionist). Even then, small imperfections might show up. Because both the glazing putty and primer dry quickly, you can do several cycles in one afternoon. This work should always be done outdoors, or in a very good light where the slightest imperfections will show up.
|
|
|
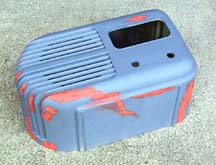
I probably went through at least 15-20 cycles of adding more glazing putty, then priming an area. I really wanted the radio to turn out like new. The area near the louvers took a lot of work. One of the cracks had gone through an area which required painstaking work to get "just right". Any flaw, no matter how small, will usually show up in the final paint if you can see it through the primer. Eventually, I was happy with the way the radio looked, and it was time for the final paint. The photo on the right shows the radio getting a new paint job. I had to do several "fixes" on the radio as I did lay on the paint a little too thick near the louvers, causing some runs. Those areas were sanded down a bit and then I re-shot more paint over the top.
|
|
|
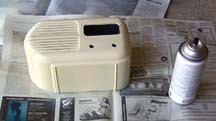
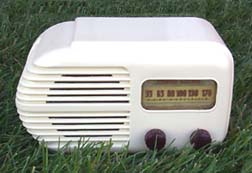
Eventually, I was happy with the final paint coat. I then let the paint cure for a few days before sanding it down and buffing it out. I wet sand with 600 grit paper, which is just about right (400 takes off too much paint). I usually go over the case with 1500 after the 600, as well. Then I buff out the paint with Novus #2 polish. The end result is a smooth, glassy finish which looks great. I then cleaned the plastic dial cover, and the knobs. I then re-assembled the radio. The finished radio is shown on the left. It turned out pretty well (it better have, a lot of work went into it)! You can't tell from the outside what trauma the radio went through, but of course the repairs are visible from the inside of the case.
Electronic Restoration
Two tubes were destroyed in shipping. I've got them on order. When I get them in, I'll go ahead and replace the electrolytics, then power up the radio and see if it works!