|
|
|
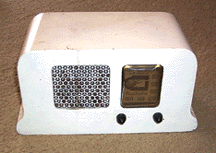
Aside from the white paint, the case looked pretty good. No huge veneer chips or cracks. The radio looked like it had been dropped at some point, as part of the case was separated underneath. All this would require was a little glue to fix. The radio powered on, but all I got was a loud hum, a symptom of blown filter capacitors. If that wasn't bad enough, the dial cord broke right after I got it home.
Cabinet Restoration
The first step in the cabinet restoration was to remove the chassis. Once that was accomplished, I glued the loose joints on the cabinet. It's important to do this before you attempt to strip the radio.
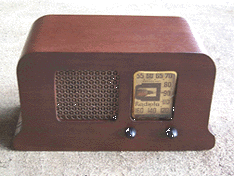
Stripping off the white paint was the next step. I used Citri-strip, a gelled stripper which is available at many hardware stores. This immediately took the paint off, and I could see the remnants of the original lacquer finish (a nice reddish brown walnut), as well as a huge splotch of red paint underneath! Perhaps someone spilled red paint on this radio, then painted it white to cover it up. Once the entire finish was off, it was apparent that the radio was a walnut veneer. This is where I began to run into problems. The walnut veneer looked great, except that it had been impregnated with white paint. There was simply no way to get all the paint out of the woodgrain. I tried sanding, but realized that I'd probably sand all the way through the veneer before I got the paint off.
What next?
I'll admit to being a bit disappointed when I realized I'd never get all that white paint off of the wood. I had had high hopes for this radio! At this point, there only seemed to be two choices. I could repaint the radio, or I could re-veneer it. I decided on the later. While I hate to perform such a radical restoration, I feel that this was the better choice. I had already sunk my $25 into it, plus a lot of time. Plus, I have no idea how many Radiola 512's are out there. While I'm sure this isn't a very rare radio (book value is in the $50-$60 range), I couldn't relegate it to the trash heap quite that easily.
|
|
|
The next step in the restoration was to stain and lacquer the case. While I was stripping the old radio, I had noticed that the finish was a nice, reddish toned dark walnut. The radio dial face is gold with a reddish brown tinged trim. It seemed reasonable that this reddish brown was probably made to closely match the wood color. It's hard to know for sure, as I was working from a radio that had been painted. I wasn't able to find a photo of another Radiola 512 to compare to. In order to try and match that color as closely as possible, I put a thin coat of red mahogany stain over the new walnut veneer. This gave the walnut a reddish tinge, just as I had noticed on the old finish.
The next step was to lacquer the radio. Almost all old radios were finished with lacquer, so it's important to use lacquer to try and keep the finish as original as possible. While tung oil or polyurethane might be easier to apply, lacquer is the way to go. In this case, I also wanted to darken the finish a bit, so I used a toning lacquer. The toning lacquer contains dyes as opposed to a clear finish. I used Mohawk Medium Walnut on this radio. Before applying the lacquer, I sprayed a thin coat of shellac over the stained veneer to help seal the wood. I then ran some 0000 steel wool over the finish, and removed all the dust with a tack cloth. After several light coats of lacquer, the finish looked just about right. After applying the toning lacquer, it's usually a good idea to also apply a few coats of clear lacquer.
|
|
|
Electronic Restoration
As purchased, the radio would turn on, light up, and emit a loud hum. This usually means that electrolytic filter capacitors need to be replaced. I pulled the chassis out of the radio while working on the cabinet, and took a look. I wrote down the ratings of the electrolytic capacitors, and bought suitable replacements. After replacing the old caps, the hum has not gone away. My next step will be to replace all the old paper capacitors in the radio. Perhaps that is the cause of the problems. I'm going to go ahead and order a schematic as well, because some the of the caps in the radio have odd voltages. Maybe someone else has worked on this radio in the past, and made a mistake. Stay tuned...!