Philco 48-200 Bakelite Tabletop (1948)
Restoration Case History
|
|
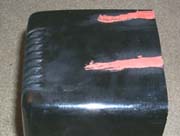
The radio in "as found" condition
|
This Philco is really pretty pathetic looking. I picked this one up for
$15 at a junk shop, to use as practice for repair. I wanted something
to practice on that wasn't terribly rare, and that I wouldn't feel
bad about messing up. These sets seem to be pretty common, I see them
for sale on E-bay quite often. The radio had a very loud
hum when purchased, a sure sign of bad filter capacitors. The radio is
constructed of ivory painted bakelite, which is badly chipped and
scratched, as you can see in the picture. The plastic dial cover
is in great shape, as are the knobs. The back of the radio is missing.
The antenna attaches to the inside of the radio cabinet, as opposed
to the back, so the missing back is not a huge issue.
Cabinet Restoration
This radio is an ivory painted bakelite, and it has quite a few chips in
the paint (obviously). This one will probably get stripped with a chemical
stripper at some point, and then I'll try my hand at repainting it.
I began the cabinet restoration by stripping the radio with Citri-Strip,
a gelled stripper. This required a lot of work. It took several
applications, as well as scrubbing and lots of work on the louvers to get
all of the paint off. In the future, I think I will just sand down the
areas where chips are located, and then repaint. Once the cabinet
was stripped, I could see that the radio was actually a black bakelite,
which was then factory painted ivory. Also more evident were two thin
stress cracks which were located on one side of the radio.
|
|
Fixing cracks with glazing putty
|
|
|
After painting the top
|
The cracks were extremely tight, and I thought that simply repainting the
radio might be enough to cover them up. However, I decided that I should
try and fix the cracks as best as possible before actually painting the
radio. With that in mind, I covered the cracked areas with a thin coat
of glazing putty. Glazing putty is used on automobiles to cover areas
where you may have fixed rust, lost a paint chip, etc. Once the putty
was dry, I sanded it down so that the repair was smooth to the touch.
The radio was now ready to be painted. I decided to use a method which
was described on the
Antique Radios Online page. The article can be found by following
this link.
Essentially, you paint each surface of the radio separately, the sand
and rub out the finish to complete the radio. I used Navajo White
paint from Ace Hardware, which seemed to be a close match to what the
radio would have looked like when new. On the upper right is a picture of
the top of the radio just after painting the top.

|
|
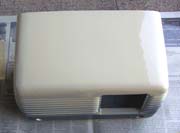
The finished radio
|
On the left is a picture of the completed radio. As you can see, it turned
out pretty well! It looks much better than the chipped up and cracked
cabinet from before. I do feel that repainting is only an option
on radios that are beyond help. An original, unaltered paint job is
much more authentic and valuable than a repainted radio.
The cabinet restoration of this radio provided
valuable experience for repainting other bakelite radios.
Electronic Restoration
When purchased, the radio emitted only a loud hum - a sure sign of shorted
or dead electrolytic capacitors. I ordered some replacements from Antique
Electronic Supply, and also ordered replacements for all the paper
capacitors in the radio. This was one of the first radios I recapped,
so for practice I went ahead and did all the capacitors, one at a time.
After completing the re-cap, the radio seemed to power on fine, but I could
not receive any stations. The loud hum was gone. I wasn't sure what
else could be wrong. I tested all the tubes, and they seemed fine. While
talking to my father on the phone, I mentioned that I couldn't pull in
any stations on this particular project. He asked if there was an antenna
attached. Well, this radio comes with an internal antenna that should
have been plenty sufficient to pull in any of the local AM stations.
However, when I examined the radio further, I could see that the connection
between the antenna and the tuning capacitor was loose. I dropped a bead
of solder onto the connection, and presto! The radio worked perfectly.
Final Thoughts..
This was a great project. While this radio is probably only worth
$30, I ended up investing much more time and effort into it than that.
That's ok, though, because it taught me several valuable lessons on
how to repair and repaint bakelite cases, as well as replace capacitors.