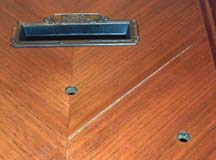
 I bought this fantastic Kingston console radio at an antique shop in Brazil, Indiana.
Kingston radios were made in Kokomo, Indiana, so this is a local radio. The finish
is in excellent shape, with only one small veneer split which you can see in the
photo on the left and below. It is the light area on the right
hand side of the radio.
The knobs are missing, but I have several that look good. The grille
cloth is not really as red as it shows in this picture. I think the cloth may
have been replaced at some point, this cloth does not look like a mid-1930's cloth to me.
I bought this fantastic Kingston console radio at an antique shop in Brazil, Indiana.
Kingston radios were made in Kokomo, Indiana, so this is a local radio. The finish
is in excellent shape, with only one small veneer split which you can see in the
photo on the left and below. It is the light area on the right
hand side of the radio.
The knobs are missing, but I have several that look good. The grille
cloth is not really as red as it shows in this picture. I think the cloth may
have been replaced at some point, this cloth does not look like a mid-1930's cloth to me.
|
|
|
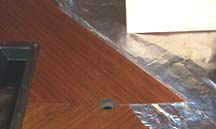
The photo on the right shows a closeup of the damage to the veneer. Two sheets of veneer were joined together, with the grain patterns forming a V-shape. It is a beautiful design. However, on the right hand piece, one area has lifted and warped. It then cracked down the center, leaving a crack in the wood. The two halves could not be rejoined, as the wood seemed to have expanded since the crack formed. Trying to flatten down the area showed that there was now an overlap between the edges. Since the area was already cracked, it seemed that a small amount of the veneer could be trimmed off, so that both pieces would again lay flat and could be glued down. That was the thought, anyway. I could have trimmed them with an X-acto knife, but was afraid I might take too much off at one time.
|
|
|
|
|
|
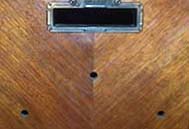
The next morning, I lifted all the stuff off the cabinet to see what the repair looked like. The repair looked pretty good, but there was one area where the veneer hadn't quite stuck down all the way. There was glue there, it just hadn't set properly. I heated this area with an iron, warming the glue, and then correctly positioned the veneer, and then weighed the area down again. When I removed the books, tv, etc, for the second time, the repair looked great. As you can see in the photo on the right, it's nearly invisible. You can see it slightly from an angle, and if you run your fingers over the area, you can just barely feel the seam between the two pieces of veneer. Overall, this repair turned out great.
There were a couple other areas of the cabinet which had loose veneer, which I simply glued down. No other repairs or refinishing were needed.
Electronic Restoration
The seller was pretty sure that the radio didn't work. I pretty much assume that these days, and then am occasionally happily surprised to get a radio that works well. I was able to find the schematic for the radio on Nostalgia Air. Before even pluging this one in, I pulled the chassis and replaced the electrolytics. This is relatively easy and hopefully keeps the radio from being damaged if powered up with shorted out filter capacitors. I then powered the radio up for the first time. I tested the filament voltages on the tubes, and they were all within specs, showing that the radio's transfomer and power supply were working properly. However, there was no sound.
Typically at this point, I would have just re-capped the whole radio, using a "brute force" method to fix any problems. This time, I decided to try and actually find the problem based on some rudimentary troubleshooting skills (and a lot of help!) With some help from the guys at the antique radio forums, we discovered that there was a shorted capacitor attached to the amplifier tube. Once this was replaced, I could now get a nice hum out of the radio, but still no stations!
The next step was to examine the audio stages. Based on some out of whack voltage readings, we were able to narrow it down to either another shorted capacitor, or an open resistor. I cut the capacitor loose, but that didn't improve the voltages. So, I cut the resistor loose, and tested it. Bingo, it had no resistance at all, meaning that it was open. I soldered in a replacement, and sure enough! I was now able to pull in a station.
The next step was to finish recapping the entire radio. Although the radio worked, I was still having some intermittent problems with it. I replaced the rest of the wax/paper capacitors, and all those problems went away. The radio now works great, I just need a place to put it!