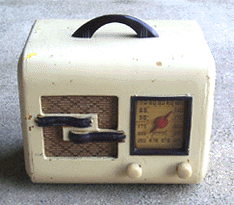
 This General Television tabletop is ivory painted wood with bakelite handle,
trim, and knobs. The case needs to be stripped because it shouldn't be
painted, but that
will be a pretty easy job. There appear to be a few dings
in the wood case that might present a challenge. I'm not really sure
if these knobs are accurate, as the Model 49 in Stein's book has brown knobs.
This General Television tabletop is ivory painted wood with bakelite handle,
trim, and knobs. The case needs to be stripped because it shouldn't be
painted, but that
will be a pretty easy job. There appear to be a few dings
in the wood case that might present a challenge. I'm not really sure
if these knobs are accurate, as the Model 49 in Stein's book has brown knobs.
This radio worked when bought, but it does have some hum which indicates that the filter capacitors are going. This will be an easy fix once the case is done.
Cabinet Restoration
|
|
|
|
|
|

|
|
|
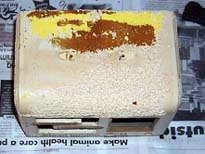
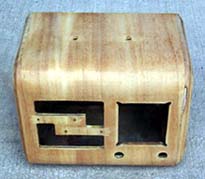
Once the last touches of the yellow paint were removed, I finished off the radio case with several coats of clear lacquer. The next step was to clean up the trim. I put a little Citri-Strip on the trim pieces to clean off the white paint. Too late, I realized that the Citri-Strip was dissolving the plastic trim! I quickly cleaned it off and much to my dismay, the trim had some pitting in it. I had violated the radio restorer's basic tenet - don't make the radio any worse. Luckily, the damage was not severe and I was able to sand down the pieces enough to clean up any damage. I then coated them with dark brown toning lacquer. The final step was to re-intall the original grille cloth, attach the trim, and install the chassis! I replaced the white knobs with brown ones, and I think the radio looks much better that way. The finished radio is shown on the right.
Electronic Restoration
The radio does work fine, but with just a touch of a hum. I'll have to go in and replace the filter capacitors at some point, but they're fine for now.